taking something old... making something new.

Wednesday, September 22, 2010

draping 101

I've never technically learned how to drape patterns. I've always used pre-made patterns or made my own patterns by combining existing ones. For the longest time, I've looked for local classes or stores that could teach me to make my own patterns or drape patterns, but I have been unsuccessful. Unless I want to attend design school, I am stuck learning by myself. I couldn't even find a good video on the internet. So, I invested in a few new handy tools: some draping tape that is used to tape the desired seam lines on your model, and a french curve ruler. To be honest, this ruler seemed a bit of a mystery to me, but then I kept hearing the people on Project Runway act exasperated when Michael C. didn't even have a ruler so I figured they must be quite handy. Here I go, trying to figure out on my own how to drape a bodice.
I started off simply enough with taping the general seams on my dress form. I changed my idea from my original design to include a yoke. The front and back yoke will be in the lace, while the bodice portion will be in the silk. This tape is pretty fun to use. it is basically really thin-cut duct tape. It follows curves nicely, sticks to the dress form, and is slightly raised so it makes it easy to trace the lines of the dress through the fabric. Which leads me to the next step.


Next, I draped and pinned a piece of muslin over the dress form so it fit snugly. I took a sharpie marker and drew lines over the tape to show where the seam lines would be.


Once I finished that, I took the muslin off the dress form and used my french curve ruler to smooth out the curves and straighten the straight lines.


After adding on a seam allowance, I cut the pattern piece out and pinned it to the dress form.


Once the yoke was pinned to the dress form, I used those seam lines to drape the bodice as well. Before marking the lines, I had to fold the darts in the appropriate place and make sure everything was nice and smooth.


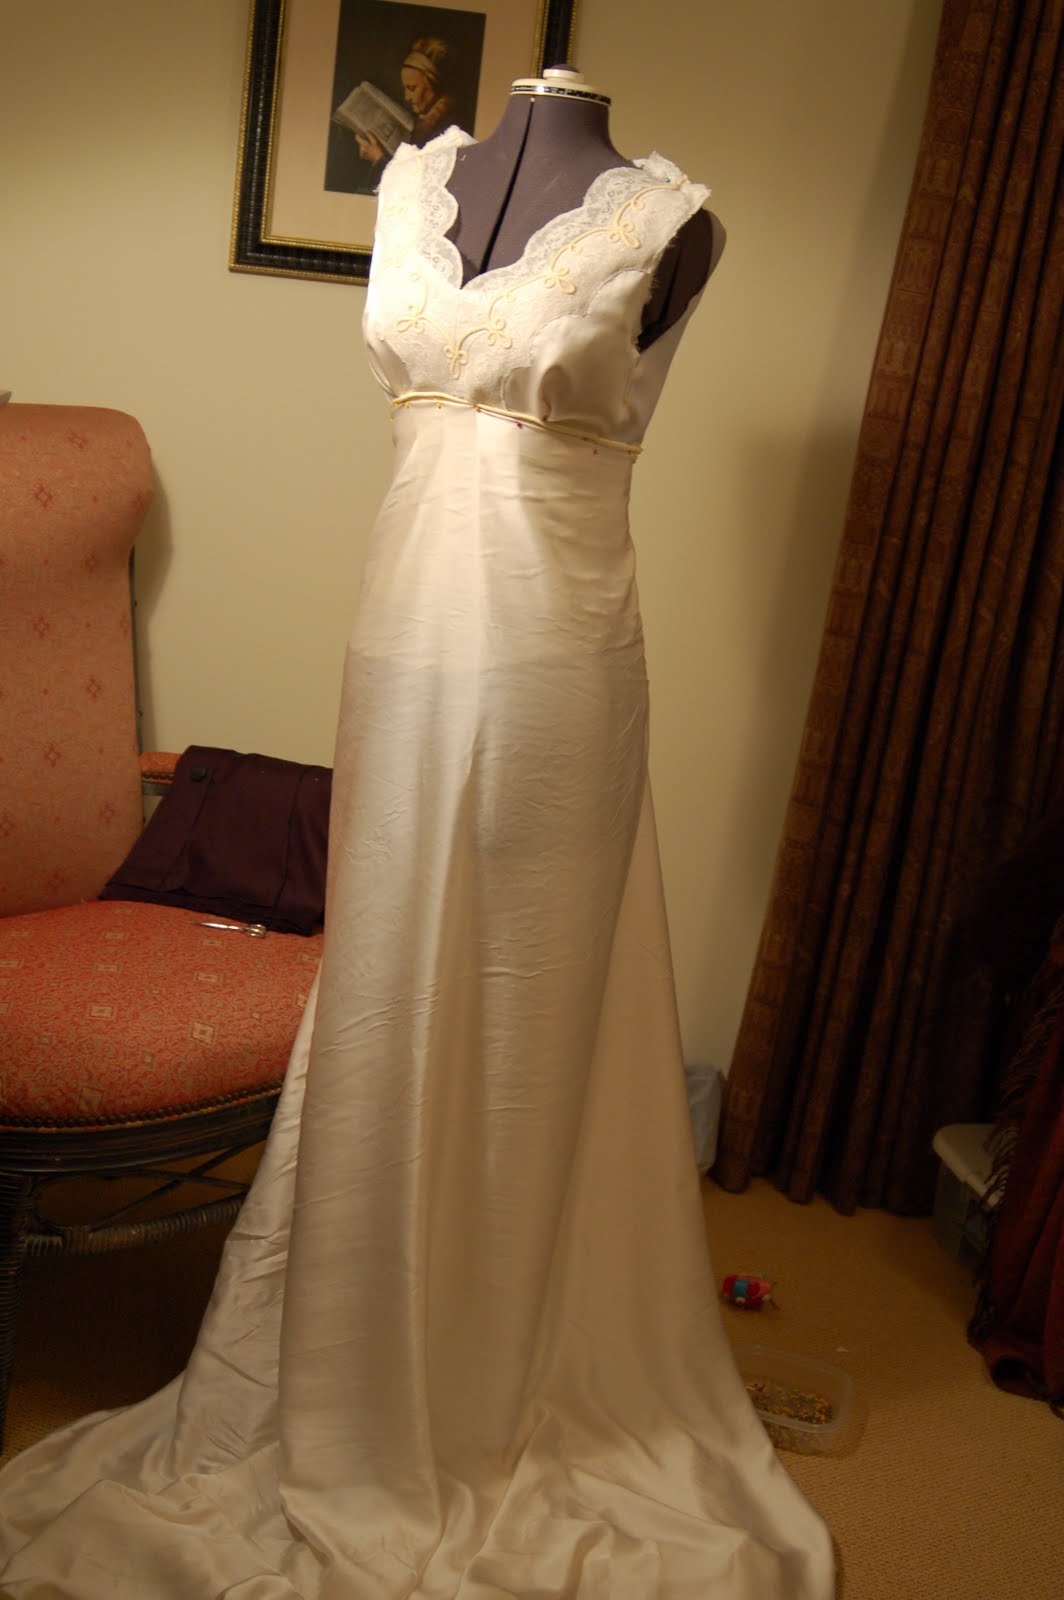
I lay the pattern pieces on the dress form one more time to be sure they all seem to fit together


Now I sew the muslin pieces and try it on myself, adjusting the seams until the bodice fits me perfectly. While wearing it, I tried my best to create a pattern for a sleeve as well. This proved to be quite difficult as I don't currently have detachable arms.


The finished sewn muslin bodice. Please forgive the awful picture. If I knew my camera better, I could adjust for the dark room, but alas, my years of high school photography have gone to waste. I did just order some studio umbrellas on ebay this week so perhaps I'll have some better light in my room for my late night sewing fests.


Now that I've got the bodice perfectly fitted, I unpicked all the seams and created new pattern pieces for the bodice. From here, I am ready to cut the pieces from my actual fabric. That's the part that is scary! I will need every little inch of that gorgeous lace!

Tuesday, September 21, 2010

Project 2: Mattie

My second project: Mattie. I'm naming this dress after my paternal grandmother, Martha "Mattie" Sharp who passed away this last year. She was such a classy, elegant woman who had such a wonderful laugh. She was the type of woman who raised a house full of boys (5 boys and 2 girls) but still managed to have her hair and makeup done every day. Shortly after my grandparents got married, my grandfather was called to serve an LDS mission. He told them that he wouldn't go unless he could bring his beautiful bride with him. With a special meeting, he got permission. She's a woman worth fighting for...and my grandfather seldom left her side. Shortly before her death, my grandparents celebrated their 70th wedding anniversary

Not all the materials I'll be using will be recycled. Two years ago, when I decided that I wanted to marry Bartek, we went to New York to visit his parents. As a fan of the show Project Runway, I decided that I needed to visit the fabric store Mood to look for some really great fabric for a wedding dress. I found this incredible French lace and fell in love with it. However, it was quite expensive and I wasn't sure if I was just loving it because it was from Mood or because I really loved it. I ended up getting a fabric sample and spent the rest of the afternoon wandering around the fabric district to see if I could find anything else. However, weeks after returning from New York, I couldn't get that lace out of my mind. So, I called my friend Leslie who lives in Manhattan, sent her the fabric scrap and some money and had her buy me a yard. I don't regret it. It is so beautiful and unique--unlike any lace I've ever seen. I'll use this for the bodice of the dress.

The fabric I chose for the bottom is from a dress that I bought at a local consignment shop while looking for shoes for my sister's wedding. I love the combination of these two fabrics. The lace has a paisley pattern to it which really compliments the circular motion of the tulle on the skirt. I'll use silk from my last dress to make a tie that will go around the waist and break up the two busy patterns. Overall, I think this dress is going to be an elegant but fun dress. Definitely not a typical wedding dress style, but will be perfect for the right bride.

Here's the sketch and a quick drape to show what these fabrics will look like together.

Monday, September 20, 2010

Diane

I've decided that I will start naming my dresses as I make them. For starters, it will make it easier to identify them later on, and I think it gives them a bit more personality. I am naming my first dress after my mother, Diane. She is such a classically elegant woman whom I look up to so much. She is a true pioneer woman who taught me to sew and taught me to be industrious. While my dad worked his way through medical school, my mom raised six children. She spent her days baking bread, gardening, cleaning, and sewing clothing for us. Some of my favorite memories are during the summers when my mom and sisters and I would pile in the car early in the morning on Wednesdays to be the first to hit the garage sales in Mission Hills--an expensive older neighborhood filled with treasure. I feel that it is only fitting to name my first dress after the woman patiently helped me cultivate a talent that has become a passion.

I am finished with my first dress and am really pleased with how it turned out. It looks very classy and elegant on and fits like a glove. I've learned a lot from this first project and look forward to not making the same mistakes on my next project! Overall, it took me just under 20 hours to complete. Here is the final product...
I've decided that I won't post any pictures wearing it until I do my photo shoot at the end. When I'm finished making all the dresses I decide to do, I'm going to have a bridal photo session with a great photographer. Not only can I have great pictures of all the dresses to keep for myself, it will help me start my portfolio. Thanks for sharing this experience with me! I'm looking forward to my next project!

Thursday, September 16, 2010

measure twice, cut once...

Wise advice from my father. Wish I had heeded it tonight. I'm so anxious to get started on a new dress, and with the outside pretty much complete, I rushed through the lining. Lesson learned... the the inside of the dress is just as important as the outside. I cut my skirt lining and didn't fit it to me before sewing it into the dress. So once I got it all put in and serged and finished, I tried the dress on, and the lining is skin tight underneath the dress. So for one, it makes the dress look sloppy because you see wrinkles under it, and it makes me look bigger because it's so tight. I could kick myself. Three hours wasted. And now I have to go back and not only take out the old lining, I've got to put in a new lining. Then I can just hem the dress and get started on a new one.

Anyway, here are some pictures so far. The fit isn't great because of that darn lining, so that will have to be remedied. And it wouldn't hurt if I could shave off some of my shoulders. They're a bit too big for this dress. Please excuse the sarcasm. Very frustrated with myself. Unfortunately, the lighting does not give much justice to the dress detail or the fabric. In fact, in this light, it looks kind of cheap, to be honest. It will look much better with good lighting and without a smirk on my face.


Tuesday, September 14, 2010

adding the skirt.

This is the exciting part and the part that I've been avoiding for quite some time. It's always hard to cut into the fabric that you love, for fear that you'll make a mistake and ruin the fabric. It's especially hard when it's for the skirt portion of the dress because it takes up so much fabric! The bodice and sleeves require so much less fabric, so it's not as devastating if you have to cut a new piece. If I were truly meticulous and patient, I would have created a muslin pattern of the skirt first, to be sure everything worked correctly and looked right. However, those who know me know that patience is not one of my virtues. So instead, I just went for it---roughly following the pattern I used for the lining and hoped for the best!.
I cut the fabric on the bias, which means that I turned the fabric diagonally so the grain of the fabric is diagonal to the ground. This makes skirts hang so beautifully off your frame. The trick with bias cut is that seams along the hips and other curvaceous areas tend to look bumpy and odd. To avoid that, I wrapped it all the way around and only did a seam in the back. I went out on a limb here because I've never done that before and wasn't sure how it would work.

Luckily it worked beautifully. The dress hangs delicately off the hips and creates a beautiful sihlouette. The overall effect is very elegant. Annie doesn't have enough of a hip or bust to give you the full effect. (so the shape looks a little saggy in this picture--looks much better with a body to fill it out) One of these days I'll get a picture of it on me. My problem is that I'm often sewing into the wee hours of the morning when nobody is awake to take a picture. Perhaps I should invest in a tripod. In the back, I added some gathering to complement the gathering along the front bustline. That way, I can avoid any weird puckering in the back and avoid making the dress too fitted in the back. I added a slight train. I'm nearing the end, though I've still got a ways to go. For starters, my zipper broke so I need to replace it. While I love invisible zippers, they are significantly more delicate and easily broken than regular zippers. I've also got to finish my seams on the inside, add the lining to the skirt, stitch the bodice lining to the seams, hem it, add a hook and eye, and give it a nice press. I'm getting anxious to start a new project!

Sunday, September 12, 2010

slow going


Wow, I've been pretty busy this week so unfortunately I haven't had as much time to sew. Besides, this is the slow, tedious partn that doesn't see as much visible progress! Anyway, I worked on the sleeves tonight. I made the sleeves go to the elbow . They're fitted at the top, slightly belled and then come in at the elbow.
They look a little sad and floppy in this picture, so I need to get a picture of it on me so you can really see what they look like. Everything looks a little sad and floppy on Annie--my new dress form--my niece Sofie named her that. Sam wanted me to name her Chubby, but since she's a little smaller than me in size, I was not very keen on calling her Chubby. Anyway, she's a bit smaller than me, so everything I put on her seems a bit droopy. Side note...I must be a football player. My shoulders are 4" broader than her. It's ridiculous.

I've also been working on lining the bodice. I love a nicely lined bodice. I think it's just as important to make it look nice on the inside as it is on the outside. It should feel quite nice while being worn.


I've basted the lining to the bottom just to make a pattern for the actual fabric. That will be my next step, and then I will be very close to being finished with my first dress! Woohoo.

Tuesday, September 7, 2010

something new

I had to work on a project for my sister tonight and I'm heading to bed early, so I haven't had a lot of progress today. I did, however, get my new dress form in the mail. Isn't she pretty? I am quite pleased. Though I still get a little frustrated because they don't make dress forms with my broad shoulders!

I'm still working on the bodice. Kind of a frustrating evening, It's not fitting quite right...

Wednesday, September 1, 2010

I mean really, who has boobs that pointy?

So it's time to start in on the bodice and I get out my adjustable dress form and try to make her measurements the same as mine, but it's impossible! Look at the boobs on that thing-nobody is shaped that way! Unfortunately, when making a dress, the bust is one of the most important areas to fit correctly. So, I came up with an excellent solution.

Voila! Problem solved. I've been sewing with this dress form for ten years and I just figured that out. Pretty sad. Actually, I am so excited, I just ordered a new dressmaker's form from PGM. They're the company that supplies the dress forms for Project Runway. My dream is to own a $700 one that is actually custom made to fit your particular body--they actually take a cast of your body. But no, I got the summer special $150 + free shipping. It's the basic "professional" model, but it's way better than my pointy boobed adjustable.

First of all, can I start off by saying that I WISH with all my heart that I could be doing this full time? I am enjoying this so much. Seriously, I've been getting home from work at 6pm every night and sewing until about 2am. I'm sick, I'm exhausted, I haven't washed my hair in three days, but I can't stop. I love this. Unfortunately, a girl's gotta eat.

So after I give Betty a little more realistic shape, I start to plan my patterns. As a self-taught seamstress, I've never had formal training in draping or pattern design so my solution is that I scour existing patterns for elements of the dress that I like and alter those patterns to fit what I want--in conjunction with a bit of draping I am able to make my own pattern .
From here, I cut a sample pattern out of muslin so I don't waste my silk. I've made that mistake one too many times.
Once I like the fit of the muslin pattern, I cut the silk and the lining.

Before sewing the lace piece to the silk, I reinforce it with a layer of netting so it doesn't get all limp.
After that I sewed it on the bodice front and I'm quite pleased with how it looks!
Before deciding how my back was going to look, I decided to drape the rest of it to get an idea of how it's going to look in the end. This isn't sewn together, just pinned and the sleeves haven't been attached yet. This is just a teaser.